Cinema4D Tutorial (Part1)
By David White. © 1999.
Cinema4D © MAXON Computer GmbH

Most of this information relates to Cinema4D V3.1 Professional
First of all, before you even load the program, you should
take some time to set up your system to make sure Cinema4D
runs as good as you can get it. Check out the setup page for
an idea of what I'm talking about.
 Right, so if you've got it all fired up and are ready..read
on...
With the standard preferences, you should see a screen with
three windows. (If its not exactly the same.. don't worry :)
- The Help window, which is at the top of the page where the
screen title is, gives you constant information of what you're
about to click on. You might want to turn it off when you get
more experienced with C4D, but for the sake of this tutorial,
leave it on.
- The Edit window, the main, largest window, split into four
different views. This is where all the 3D editing and moving
etc. takes place. You spend most of your time in here.
- The Toolbar, on the left hand side with the icons on it.
This has all the basic features of Cinema4D ready to access,
like move, size, rotate, redraw, magnify, axes, and textures.
Also, one thing you should notice and remember is the set of 6
buttons at the bottom of this window (XY, ZY, XZ etc...).
These buttons select which view you can see in the main edit
window. Currently, it should be on 4T, which is a mixture of
them all. I'll explain them later.
Right now on 4T, it isn't very clear to see whats going on.
Click on the XY button which takes you to the front view.
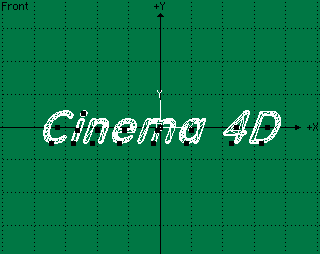
Now onto the first object ; from the pull down menus, select
Object � Special Object � Text Hold down the SHIFT key
while you select 'Text'. Why? Well see that little circle on
the text menu item? This means that it has further options, so
if you hold down SHIFT while selecting it, you can change
the object settings before it is created. You can do this with
any item that has a small black circle next to it.
In the 'Text' dialog box, enter 'Cinema 4D'. For font, open up
the file requester and go into the 'DIAMOND' directory, and
hit OK. Make the font attributes Italic, and then click OK.
Right, so if you've got it all fired up and are ready..read
on...
With the standard preferences, you should see a screen with
three windows. (If its not exactly the same.. don't worry :)
- The Help window, which is at the top of the page where the
screen title is, gives you constant information of what you're
about to click on. You might want to turn it off when you get
more experienced with C4D, but for the sake of this tutorial,
leave it on.
- The Edit window, the main, largest window, split into four
different views. This is where all the 3D editing and moving
etc. takes place. You spend most of your time in here.
- The Toolbar, on the left hand side with the icons on it.
This has all the basic features of Cinema4D ready to access,
like move, size, rotate, redraw, magnify, axes, and textures.
Also, one thing you should notice and remember is the set of 6
buttons at the bottom of this window (XY, ZY, XZ etc...).
These buttons select which view you can see in the main edit
window. Currently, it should be on 4T, which is a mixture of
them all. I'll explain them later.
Right now on 4T, it isn't very clear to see whats going on.
Click on the XY button which takes you to the front view.
Now onto the first object ; from the pull down menus, select
Object � Special Object � Text Hold down the SHIFT key
while you select 'Text'. Why? Well see that little circle on
the text menu item? This means that it has further options, so
if you hold down SHIFT while selecting it, you can change
the object settings before it is created. You can do this with
any item that has a small black circle next to it.
In the 'Text' dialog box, enter 'Cinema 4D'. For font, open up
the file requester and go into the 'DIAMOND' directory, and
hit OK. Make the font attributes Italic, and then click OK.
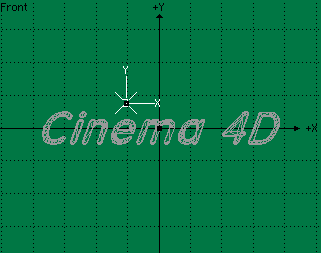
 Our first object =). You notice all those little black boxes
that are on the text? These 'axes' let you 'pick' an object to
be edited. Right now, all of the letters are selected, but you
can pick individual ones by clicking on the axes at the bottom
of each letter. Try it out. You can also try different views
of the object now by clicking on the view icons on the
toolbar, best of all 'P' (Perspective) and '3D' Modes.
Next, go back to front view (XY) if you moved from it, and
select all of the letters (the axis in the middle of the
'm'). If you get it right, all of the text will go white. We
want to get rid of all these axes and end up with just one for
the entire text. Go to Extra � Structure � Merge, or smack
AMIGA+H, and they'll disappear =)
If we rendered our object right now, it would look crap, full
stop. The internal default material looks a bit like chalk
which is pretty damn dull even for the dullest object. Hit O
on the keyboard, or go to Edit � Material Edit... Choose yes.
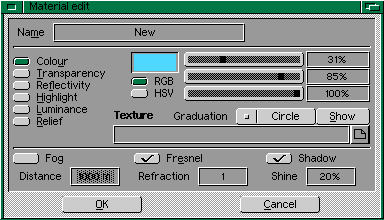
Ok now we want to make these letters a bit more interesting.
How about some blue glass? Adjust the RGB sliders to give you
a nice pale cyan colour. (31,85,100 was used in this example
if you want to be perfect =] ). Next, click on the
transparency radio button. We want it to be quite transparent,
so I'd say (85,85,85) would be just about right here. On to
highlight, make this a slightly lighter shade of your previous
blue. In the shine box, enter 20%, and click OK. If you get
asked to assign the material to sub-objects, click ok.
Our first object =). You notice all those little black boxes
that are on the text? These 'axes' let you 'pick' an object to
be edited. Right now, all of the letters are selected, but you
can pick individual ones by clicking on the axes at the bottom
of each letter. Try it out. You can also try different views
of the object now by clicking on the view icons on the
toolbar, best of all 'P' (Perspective) and '3D' Modes.
Next, go back to front view (XY) if you moved from it, and
select all of the letters (the axis in the middle of the
'm'). If you get it right, all of the text will go white. We
want to get rid of all these axes and end up with just one for
the entire text. Go to Extra � Structure � Merge, or smack
AMIGA+H, and they'll disappear =)
If we rendered our object right now, it would look crap, full
stop. The internal default material looks a bit like chalk
which is pretty damn dull even for the dullest object. Hit O
on the keyboard, or go to Edit � Material Edit... Choose yes.
Ok now we want to make these letters a bit more interesting.
How about some blue glass? Adjust the RGB sliders to give you
a nice pale cyan colour. (31,85,100 was used in this example
if you want to be perfect =] ). Next, click on the
transparency radio button. We want it to be quite transparent,
so I'd say (85,85,85) would be just about right here. On to
highlight, make this a slightly lighter shade of your previous
blue. In the shine box, enter 20%, and click OK. If you get
asked to assign the material to sub-objects, click ok.
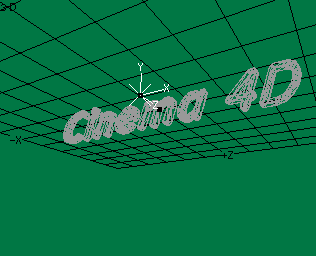
 And onto a preview render. Click on the 'P' view button in the
toolbar to take you to Perspective mode. The difference
between 'P' and '3D' modes is that '3D' is purely an edit
mode, while Perspective mode is in fact what the camera sees.
Whatever you see in Perspective mode is what is rendered. We
want to move from object mode to camera mode, to do this
select the eye icon on the top left of the toolbar. Now when
we move, rotate or size, the view is changed instead of the
active object.
Lets rotate the view. Click on the rotation tool icon, and
then click anywhere inside the edit window (not on any axes)
and drag the mouse, to the left, right, down and up, until you
get a view you like.
The render icon is underneath the magnifying glass, right
click on it, and a popup menu appears, select 'Scanline'. On
the General page, pick a small (320x240) picture size, and in
picture mode select the screenmode closest to this size, with
the most amount of colours you can get (probably
320x256x262,144 on an AGA machine).
Click on render, and wait a few seconds for the render to be
finished, before clicking on 'show frame' to view the render.
You can rotate the Perspective view and try rendering again,
to see it from different angles if you like.
Still sucks, doesn't it? We need some proper lighting.
Cinema4D always has a standard default light of its own to
save you having to add any at first. Unfortunately you cant
change its position, colour, intensity etc. so we'll have to
add our own. As soon as you add your own custom light
source(s) the default light will disappear.
Go back to the front view (XY), then
Objects � Primitives � Light Source You should see a small X in
in the middle of the view, this is our new light. Go back to
objects mode (click on the cube icon), and then select the
move tool ( the single arrow pointing right).
We want to move the light just on top of the 'e' in 'cinema',
so click anywhere on the edit window (not on the light, or any
other axes) and drag the mouse to move the light. Move it up,
and left, just above the 'e' object. To make it go 'behind'
the letters, switch to side view (ZY) and move the light to
the right, deeper into the scene.
And onto a preview render. Click on the 'P' view button in the
toolbar to take you to Perspective mode. The difference
between 'P' and '3D' modes is that '3D' is purely an edit
mode, while Perspective mode is in fact what the camera sees.
Whatever you see in Perspective mode is what is rendered. We
want to move from object mode to camera mode, to do this
select the eye icon on the top left of the toolbar. Now when
we move, rotate or size, the view is changed instead of the
active object.
Lets rotate the view. Click on the rotation tool icon, and
then click anywhere inside the edit window (not on any axes)
and drag the mouse, to the left, right, down and up, until you
get a view you like.
The render icon is underneath the magnifying glass, right
click on it, and a popup menu appears, select 'Scanline'. On
the General page, pick a small (320x240) picture size, and in
picture mode select the screenmode closest to this size, with
the most amount of colours you can get (probably
320x256x262,144 on an AGA machine).
Click on render, and wait a few seconds for the render to be
finished, before clicking on 'show frame' to view the render.
You can rotate the Perspective view and try rendering again,
to see it from different angles if you like.
Still sucks, doesn't it? We need some proper lighting.
Cinema4D always has a standard default light of its own to
save you having to add any at first. Unfortunately you cant
change its position, colour, intensity etc. so we'll have to
add our own. As soon as you add your own custom light
source(s) the default light will disappear.
Go back to the front view (XY), then
Objects � Primitives � Light Source You should see a small X in
in the middle of the view, this is our new light. Go back to
objects mode (click on the cube icon), and then select the
move tool ( the single arrow pointing right).
We want to move the light just on top of the 'e' in 'cinema',
so click anywhere on the edit window (not on the light, or any
other axes) and drag the mouse to move the light. Move it up,
and left, just above the 'e' object. To make it go 'behind'
the letters, switch to side view (ZY) and move the light to
the right, deeper into the scene.
 We're going to make this light a bit more interesting, with a
lens flare and some reflections. Go to Extra � Light/Polygon or
press D. In 'direct visibility' select XYZ decreasing from
the cycle menu, then click on lens effects. Check Lense Glow
and Lense Reflexions to make them active, then click OK. Change
the colour of the light to a pale peachy/orangey colour (I used
100,83,70) using the sliders in this window, and then click
OK.
Create a new lightsource, the same way as before, but in the
side view, move it much further to the left (to the edge of
the editor display) and down about half way. Don't give this
light any effects, but make it the same colour as the last
one, and make sure the brightness is set to 50% (the
brightness is just below the colour sliders in the light edit
window).
Lastly, go back into Perspective view, select camera mode,
rotation, and rotate the view so that you get a nice dramatic
view from underneath the text object. Make sure the first
light we made (with the lensflare) is not tucked behind any of
the letters when you view it from Perspective mode.
We're going to make this light a bit more interesting, with a
lens flare and some reflections. Go to Extra � Light/Polygon or
press D. In 'direct visibility' select XYZ decreasing from
the cycle menu, then click on lens effects. Check Lense Glow
and Lense Reflexions to make them active, then click OK. Change
the colour of the light to a pale peachy/orangey colour (I used
100,83,70) using the sliders in this window, and then click
OK.
Create a new lightsource, the same way as before, but in the
side view, move it much further to the left (to the edge of
the editor display) and down about half way. Don't give this
light any effects, but make it the same colour as the last
one, and make sure the brightness is set to 50% (the
brightness is just below the colour sliders in the light edit
window).
Lastly, go back into Perspective view, select camera mode,
rotation, and rotate the view so that you get a nice dramatic
view from underneath the text object. Make sure the first
light we made (with the lensflare) is not tucked behind any of
the letters when you view it from Perspective mode.
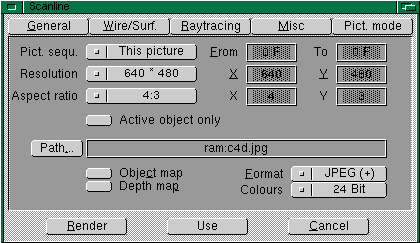
 Go to scanline render again (remember to use the right mouse
button to select it), and select 640x480 size this time.
Choose JPEG(+), and 24 bit for the file format, and enter
'RAM:C4D.jpg' in the path string box. Go to the Raytracing
section, and set Antialiasing on 3. Finally, go to the
Pict.Mode section and make sure it is set on 'NO DISPLAY'
(This makes rendering faster). Click on Render.
Go to scanline render again (remember to use the right mouse
button to select it), and select 640x480 size this time.
Choose JPEG(+), and 24 bit for the file format, and enter
'RAM:C4D.jpg' in the path string box. Go to the Raytracing
section, and set Antialiasing on 3. Finally, go to the
Pict.Mode section and make sure it is set on 'NO DISPLAY'
(This makes rendering faster). Click on Render.
 Your final picture should take a few minutes to render (about
4 mins on 060/50), and when it is, you should find it in the
ram disk named 'c4d.jpg.0000'. You can view this using most
decent picture viewers/paint programs.
Your final picture should take a few minutes to render (about
4 mins on 060/50), and when it is, you should find it in the
ram disk named 'c4d.jpg.0000'. You can view this using most
decent picture viewers/paint programs.
 Its not the most interesting thing on earth, but its pretty
good for a first attempt. We've covered objects, light sources,
views, materials, and rendering.. but there's still a lot to go =)
David
Its not the most interesting thing on earth, but its pretty
good for a first attempt. We've covered objects, light sources,
views, materials, and rendering.. but there's still a lot to go =)
David